Email synchronization
List of paragraphs:
- For system admin
- For system user
- If you use IMAP protocol
- If you use Office 365
- If you use 2FA (two factor authentication)
- The most used mail servers settings
- If you use serveriai.lt email settings
- In case you encounter errors in the Email module
System provides possibility to synchronize user's email and archive letters of Customers and Leads. Letters are assigned according to:
- Customer main email;
- Customer's contact email;
- Lead main email;
- Lead's contact email;
- Customer domain.
Email synchronization can be enabled either by system admin or by user individually.
For system admin
- 1
-
Log in to the system
- 2
- Choose Setup -> Staff.
- 3
-
In the list of employees, select employee and go to his profile:
-

- 4
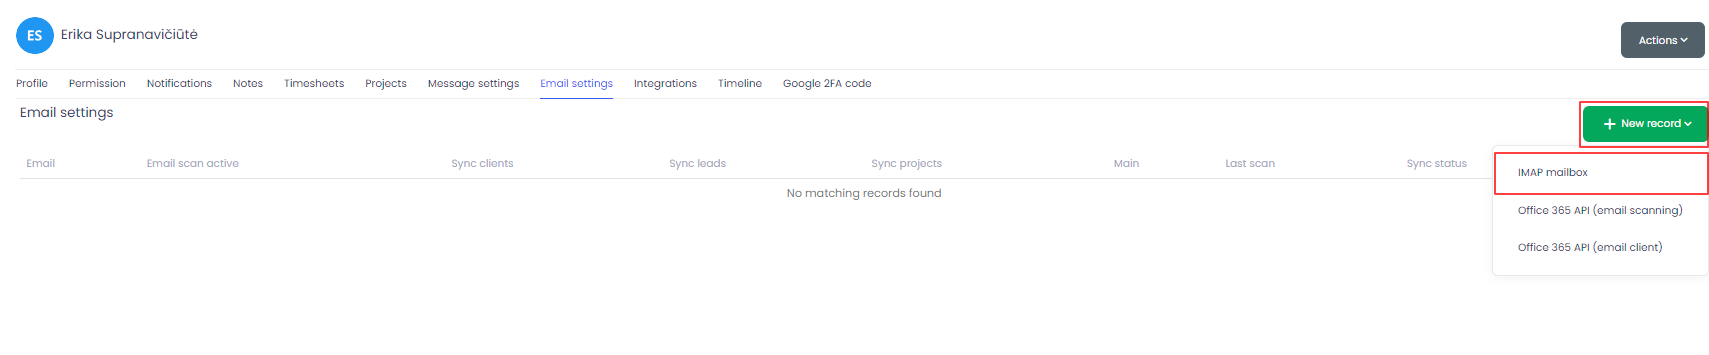
- Select Email settings, press New record and select IMAP mailbox, Office 365 API (email scanning) or Office 365 API (email client):
-


For system user
- 1
- Log in to the system.
- 2
- Choose My profile:
-

- 3
- Select Email settings and press New record:
-
-
• IMAP mailbox - you can connect various mailboxes and use E-mail mail module.• Office 365 API (email scanning) - the option is used when you only want e-mails to be scanned and displayed in customers profile card.• Office 365 API (e-mail client) - it is possible to connect Office mailboxes that are used by organizations (domains used by work or school).

If you use IMAP protocol
- 1
- Press New record and select IMAP mailbox:
-

- 2
- Enter the settings: Email, Password, IMAP server, IMAP port, IMAP charset, SMTP server, SMTP port, SMTP charset. Only enter Email (username) if it differs from Email. Insert details and press Email scan active. Select Sync clients and/or Sync leads. Below Sync directories you will be able to pick folders for email synchronization.
-

- 3
-
Enter username only if username and email address differs.
- 3
-
Check Main too see chosen mailbox emails in module Email.
- 5
-
Click Test connection. If entered information is correct, you will see option Submit - press it. If information is not entered correctly, you will be notified.
-

- 6
-
One user can have several mailboxes.
- 7
-
Your mailbox will be regularly scanned and emails will be archived and linked to Customers/Leads (emails are scanned every 10 minutes).


If you use Office 365
- 1
- Press Office 365 API (email scanning):
-

- 2
- Enter your username, password and press Sign in.
-

- 3
- In the new window, mark Email Scan Active, Sync Clients and/or Sync Leads and mark folders that have to be synched.
-

- 4
- Press Save.
- 5
- Your mailbox will be regularly scanned and emails will be archived and linked to Customers/Leads (emails are scanned every 10 minutes).


If you use 2FA (two factor authentication)
- 1
- Select Manage your Google Account:
-

- 2
-
Select Security - App passwords:

- 3
-
Select app and choose Other (Custom name) - insert Hanna CRM and press Generate:
- 4
- Inside yellow field will appear your generated password:
- 5
- Generated password insert into Hanna CRM system Email settings:


The most used mail servers settings
When adding a new mailbox, enter the email settings:

Below are the most commonly used email servers settings:
| Email server | IMAP server | IMAP port | IMAP encryption | SMTP server |
|
SMTP port | SMTP encryption |
|
|
| Interneto vizija (serveriai.lt) | example.serveriai.lt | 993 | SSL | example.serveriai.lt |
|
465 | SSL |
|
|
| Gmail | imap.gmail.com |
|
993 | SSL | smtp.gmail.com |
|
465 | SSL |
|
| Yahoo | imap.mail.yahoo.com |
|
993 | SSL | smtp.mail.yahoo.com |
|
465 | SSL |
|
| Outlook (Office 365) | outlook.office365.com | 993 | SSL | smtp.office365.com |
|
587 | TLS |
|
If you use serveriai.lt email settings
If you use www.serveriai.lt email services, you can get your email settings using this link
Enter your email e-mail address, specify the protocol, specify the language of the program and select the button - Settings:

You will see your email server settings below Serverio Informacija (Server Information):

Enter the specified settings into the system and connect your e-mail box:

In case you encounter errors in the Email module
If you select Email module and get following errors:
- Cannot connect to IMAP server.
- Server error: AUTHENTICATE XOAUTH2: A0001 NO AUTHENTICATE failed.
- Can not send emails from Email module.
- SMTP Error (535): Authentication failed.
First of all, you should follow this instruction - https://learn.microsoft.com/en-us/exchange/clients-and-mobile-in-exchange-online/authenticated-client-smtp-submission
You also need to set permissions on the email account. Select Users - Active users:

Select your account - in the window on the right side, select Mail -> Manage email apps:

